Maintaining a dry and stable foundation is critical for any structure. Installing weeping tile around the foundation is one of the most effective methods to prevent water from compromising the integrity of your home’s base. This guide will take you step by step through the process of installing foundation weeping tile, ensuring that your home remains solid and moisture-free for years to come.
What Is Weeping Tile?
Weeping tile, also known as a weeping tile system or a French drain, is a crucial component of a home’s drainage system designed to manage groundwater and prevent water damage to the foundation. In this comprehensive explanation, we will delve into the composition, purpose, installation, maintenance, and historical context of weeping tile systems.
Composition of Weeping Tile
Weeping tiles are typically constructed from plastic materials like PVC (polyvinyl chloride) or corrugated HDPE (high-density polyethylene) due to their durability and resistance to corrosion. The choice of plastic materials ensures longevity in harsh environmental conditions. The pipe itself is perforated with small slits or holes, strategically placed to allow water to enter the pipe. These perforations enable the system to capture and divert groundwater effectively, preventing it from accumulating around the foundation.
The term “weeping tile” has historical significance. Early weeping tile systems were made of terracotta, and their appearance resembled traditional clay roofing tiles. These tiles were arranged in a manner that allowed them to “weep” water away from the foundation. While the name persists, modern materials have largely replaced terracotta in contemporary installations.
Key Features of Weeping Tile
| Feature | Description |
| Material | PVC or HDPE plastic |
| Perforations | Small slits or holes for water entry |
| Shape | Typically cylindrical |
| Diameter | Commonly 4 inches (10 cm) in residential use |
| Installation Depth | Buried underground near the foundation |
Purpose of Weeping Tile
The primary purpose of weeping tile systems is to effectively manage excess groundwater and prevent it from accumulating around the foundation of a building. This accumulation of water can lead to a multitude of problems, including foundation damage, basement flooding, and the growth of mold and mildew. Weeping tiles play a pivotal role in ensuring that water is collected and safely redirected away from the structure.
Benefits of Weeping Tile Systems:
- Foundation Protection: Weeping tiles serve as a protective barrier for the foundation by preventing water from infiltrating the soil around it. This safeguards against shifting, cracks, and structural damage;
- Basement Waterproofing: These systems help maintain dry and moisture-free basements, making them suitable for storage or additional living space;
- Prevention of Mold and Mildew: By effectively reducing moisture levels around the foundation, weeping tiles deter the growth of mold and mildew, which can have adverse effects on both the structure and occupants’ health;
- Improved Landscaping: Beyond their role in building protection, weeping tile systems can be employed in landscaping to manage water runoff, prevent erosion, and maintain the overall integrity of the property’s grounds.
Historical Context
The use of weeping tiles can be traced back to ancient civilizations, where various techniques were employed to manage groundwater around structures. Early weeping tile systems often involved the use of terracotta pipes, which were laid beneath the ground to channel water away from buildings. These rudimentary systems paved the way for the development of modern weeping tile systems made from durable plastic materials.
In contemporary construction practices, weeping tile systems have evolved significantly, incorporating advanced materials and installation techniques to provide superior protection against water-related issues. As a result, they have become an integral part of building foundations, ensuring the longevity and structural integrity of residential and commercial properties alike.
Understanding the Need for Weeping Tile Around Foundation
Water management around your home’s foundation is of paramount importance. Let’s explore in greater detail the reasons why a weeping tile system is indispensable for safeguarding your foundation and overall structural integrity:
Hydrostatic Pressure
Hydrostatic pressure is a fundamental concern when it comes to foundation protection. This force is the result of water accumulating in the soil surrounding your home. As water saturates the soil, it exerts tremendous pressure on your foundation walls. Over time, this continuous pressure can lead to significant structural damage, including the formation of cracks in your foundation walls. A weeping tile system acts as a crucial ally in this battle by providing a highly efficient drainage pathway for excess water away from the foundation.
Moisture Problems
Excessive moisture in and around your foundation can give rise to a host of issues, each with its own set of consequences:
- Mold and Mildew: When moisture levels are elevated, the conditions become ripe for mold and mildew growth. These fungi not only threaten the structural integrity of your home but also pose health risks to its occupants;
- Basement Flooding: Accumulated water has a proclivity for infiltrating basements, often leading to flooding. The consequences can be both financially burdensome and emotionally distressing, as damage to personal belongings and structural components can be extensive;
- Rot and Decay: Wood, in particular, is highly susceptible to rot and decay when exposed to prolonged moisture. This poses a significant risk to the structural stability of your home. Components such as wooden support beams and floor joists can become compromised, requiring costly repairs.
Structural Failure
In the most severe cases, uncontrolled water exposure can culminate in structural failure. When the foundation weakens due to persistent water-related issues, it can necessitate substantial and expensive repair work. In the worst scenarios, a structurally compromised foundation may render the entire house unsafe for occupancy.
Given these potential consequences, the installation of a properly designed and maintained weeping tile system becomes a critical defense mechanism for your home’s longevity and your peace of mind.
Components of a Weeping Tile System
A weeping tile system is a multi-faceted solution designed to effectively manage water around your foundation. It comprises several essential components, each playing a unique role:
Perforated Pipe (Weeping Tile)
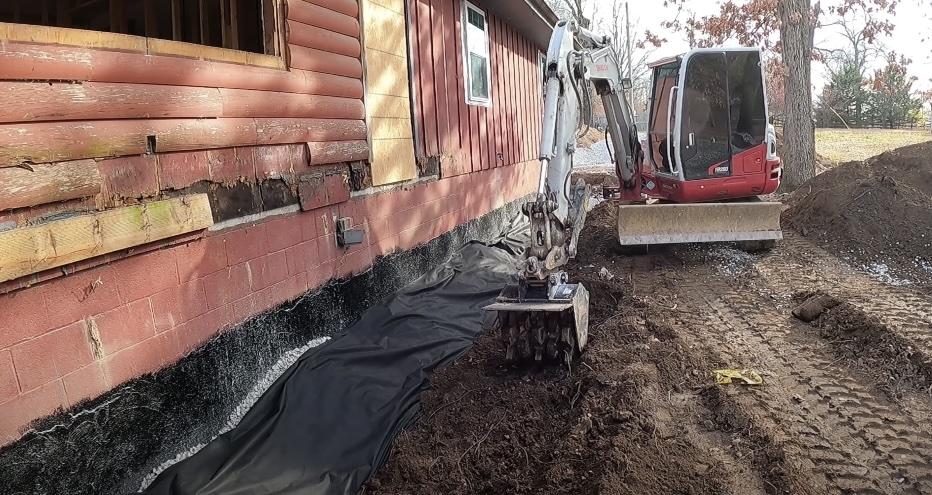
The perforated pipe, commonly referred to as “weeping tile,” serves as the central conduit within the system. It is specifically designed with small holes or perforations along its length, allowing water to enter. This pipe is strategically placed either inside the footing or just outside it, depending on the chosen installation method. Its primary function is to collect and channel excess water away from your foundation.
Filter Fabric
To ensure the longevity and optimal performance of the weeping tile system, a filter fabric or geotextile membrane is employed. This fabric is meticulously wrapped around the perforated pipe. Its critical role is to prevent soil particles and debris from infiltrating and clogging the weeping tile, thereby ensuring that water can easily and freely flow into the pipe without obstruction.
Gravel
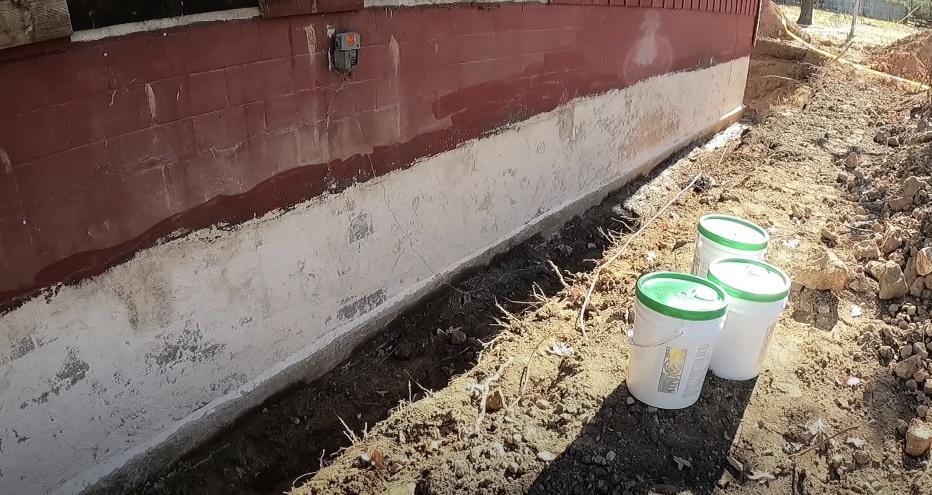
A layer of coarse gravel or crushed stone envelops the weeping tile. This gravel serves multiple purposes, including providing a stable and well-draining base for the pipe. Additionally, it facilitates efficient water flow into the weeping tile system by promoting percolation through the gravel layer.
Sump Pump
In many instances, a weeping tile system is integrated with a sump pump. The sump pump functions as the final line of defense against water intrusion. It collects the water that flows into the weeping tile system and promptly pumps it away from the foundation. The discharge point is typically located at a safe distance from the house, ensuring that the water does not return to threaten the foundation.
Step-by-Step Guide to Installing Foundation Weeping Tile
Step 1: Plan Your Project
Before embarking on your weeping tile installation, it’s imperative to plan the project thoroughly. This entails identifying the critical areas around your foundation where water tends to accumulate, which is often indicated by signs of water damage or dampness. Additionally, consider the local climate and groundwater levels, as these factors will influence the design and capacity of your weeping tile system. A comprehensive understanding of your property’s drainage patterns is essential for a successful installation.
Step 2: Gather Materials and Tools
To execute the weeping tile installation effectively, you’ll need the following materials and tools:
| Materials and Tools | Description |
| Weeping tile piping | Perforated plastic or PVC pipe designed for water collection. The diameter and length of the pipe will depend on the size of your project. |
| Filter cloth or geotextile fabric | This fabric serves as a crucial barrier to prevent soil from infiltrating and clogging the weeping tile system. |
| Crushed stone or gravel | Clean and well-graded material that provides drainage and stability. |
| Shovel or excavator | For digging the trench to the required depth and width. |
| Wheelbarrow | To transport gravel and soil efficiently. |
| Pipe connectors and fittings | These components are necessary for connecting weeping tile sections, corners, and ensuring a secure, watertight fit. |
| Safety gear | Personal protective equipment such as gloves, goggles, and appropriate clothing to ensure safety during excavation and construction. |
Step 3: Excavate Around the Foundation
In this step, you’ll excavate a trench around the foundation to accommodate the weeping tile system. Pay meticulous attention to the following details:
- Depth and Width: The trench should be deep enough to reach the footing or the bottom of the foundation wall. Typically, a depth of 12 inches is recommended, but it can vary depending on your specific needs. The width of the trench should be sufficient to accommodate the weeping tile and allow for proper installation and maintenance;
- Slope: It’s critical to ensure that the trench has a slight slope away from the house. The ideal slope is approximately 1 inch drop per 8 feet of run. This slope directs water away from the foundation and towards the weeping tile system, facilitating efficient drainage.
Step 4: Lay the Filter Fabric
Before placing the weeping tile, cover the bottom of the trench with filter fabric. Extend the fabric up the sides of the trench to create a protective barrier that prevents soil infiltration and clogging of the weeping tile. Properly securing and sealing the filter fabric is essential to its effectiveness.
Step 5: Add a Bed of Gravel
Create a base layer in the trench by pouring a 2- to 3-inch deep bed of clean crushed stone or gravel. This layer serves multiple purposes:
- Provides drainage: The gravel allows water to flow freely towards the weeping tile, preventing water buildup around the foundation;
- Supports the weeping tile: The gravel bed stabilizes the weeping tile, preventing it from shifting or collapsing under the weight of soil.
Step 6: Install the Weeping Tile
Now, it’s time to place the weeping tile into the trench. Take note of the following considerations:
- Orientation: Lay the weeping tile with the perforated holes facing downward into the gravel bed. This orientation ensures that silt, debris, and soil particles do not enter the pipe, which can hinder water flow and reduce the system’s effectiveness;
- Connections: Utilize pipe connectors and fittings as needed to connect the weeping tile sections, navigate corners, and create a continuous, sealed system. Properly fitting and securing the connections is crucial to prevent leaks.
Step 7: Cover with Gravel
Once the weeping tile is securely in position, cover it with additional gravel. The layer of gravel should extend up to 6 inches above the top of the weeping tile. This additional gravel provides additional drainage capacity and further protects the weeping tile system from soil intrusion.
Step 8: Wrap the Filter Fabric
Fold the excess filter fabric over the top of the gravel, completely encapsulating the weeping tile system. Properly sealing the filter fabric prevents soil and debris from entering the gravel and weeping tile, preserving the long-term functionality of the system.
Step 9: Backfill the Trench
Carefully backfill the trench with the soil that was excavated earlier. Take care to compact the soil slightly as you fill the trench to ensure stability. Proper compaction is essential to prevent settling and maintain the integrity of the weeping tile system.
Step 10: Landscape Restoration
In the final step, restore your landscape to your preferences while ensuring proper drainage away from the foundation. Adequate grading of the soil is essential, as it directs surface water away from your home. Ensure that the soil slopes away from the foundation at a gentle angle to prevent water from pooling near the structure.
Tips for Successful Installation

When installing a weeping tile system for effective drainage around your foundation, it’s essential to follow a well-structured plan to ensure the system works efficiently and avoids common problems. Here are some tips for a successful installation:
Safety First
Safety should always be your top priority when working around excavations. Here are some safety precautions to take:
- Wear Safety Gear: Always wear appropriate safety gear, including a hard hat, gloves, safety glasses, and steel-toed boots;
- Excavation Safety: Make sure the excavation site is properly shored up and secured to prevent cave-ins or accidents;
- Utility Locates: Before digging, call your local utility company to locate and mark any underground utilities to avoid accidental damage.
Water Testing
Before you complete the installation, it’s wise to test the weeping tile system by running water through it. This will help ensure proper flow and identify any issues that need to be addressed before backfilling. Follow these steps:
- Connect a Hose: Attach a garden hose to the weeping tile inlet or inspection port.
- Run Water: Turn on the water and allow it to flow through the system;
- Check Flow: Observe the water flow through the system to ensure it’s running smoothly;
- Inspect for Leaks: Look for any leaks or water escaping from the system, as this can indicate a problem;
- Adjust as Needed: If you identify any issues, make the necessary adjustments before proceeding.
Permit and Codes
Compliance with local building codes and obtaining the required permits is crucial for a successful weeping tile installation. Here’s what you should do:
- Check Local Regulations: Contact your local building department or municipality to understand the specific requirements and codes related to weeping tile systems;
- Permit Application: If required, submit a permit application and pay any associated fees;
- Compliance: Ensure that your installation adheres to all local codes and regulations. This may include the depth and placement of the weeping tile, backfill materials, and inspection requirements.
Troubleshooting Common Problems

Even with a well-executed installation, you may encounter common problems with your weeping tile system over time. Here are some troubleshooting tips to address these issues:
Clogs
Clogs in the weeping tile can significantly reduce the effectiveness of the drainage system. Regular inspection and maintenance can help prevent this problem. Here’s what you can do:
- Inspection: Periodically inspect the weeping tile system for any signs of clogs, such as slow drainage or water pooling around the foundation;
- Flushing: If you notice reduced flow, attempt to flush the weeping tile system by running water through it at high pressure. This may dislodge debris and clear minor clogs;
- Replacement: In cases of severe clogs or damage to the weeping tile, consider replacing the affected section or the entire system.
Settling
Over time, the ground around the foundation may settle, causing changes in the slope or position of the weeping tile system. To maintain effective drainage, follow these steps:
- Regular Monitoring: Periodically inspect the area around the foundation for any signs of settling or changes in the landscape;
- Adjustment: If settling is detected, adjust the weeping tile system to ensure it maintains the proper slope and drainage angle;
- Regrading: In cases of significant settling, you may need to regrade the soil around the foundation to maintain the desired slope away from the building.
Conclusion
Installing weeping tile around a foundation is a proactive measure to ensure the longevity and integrity of your home’s structure. By following this detailed guide, you can successfully install a foundation weeping tile system and rest easy knowing that your home is protected from the potential dangers of water damage. Always remember to consult with professionals if you encounter issues beyond your expertise, and never underestimate the importance of a well-functioning drainage system for your foundation’s health.
FAQ
Q: How often should I check my foundation weeping tile system?
A: Inspect your system at least annually, ideally during heavy rains to ensure it’s operating correctly.
Q: Can roots interfere with weeping tile around the foundation?
A: Yes, tree roots can penetrate and clog the weeping tile. Planting trees a safe distance away from your foundation is recommended.
Q: What should I do if my weeping tile system is not draining properly?
A: You may need to consult a professional to assess whether there’s a clog or if additional drainage solutions are needed.
Q: Can I install weeping tile around an old foundation?
A: Absolutely, foundation weeping tile systems can be retrofitted around older foundations to help alleviate water problems.
Q: How deep should the weeping tile be around the foundation?
A: The top of the weeping tile should be at or below the level of the footing to effectively catch water at the foundation’s base.
Q: Do weeping tile systems require maintenance?
A: Yes, while they are low maintenance, occasional inspections and cleanings are necessary to ensure optimal performance.